

One of the most crucial considerations for producing high-quality prints from a 3D printer is bed adhesion. 3D printer bed adhesion helps make sure your final product stays tightly to the build platform while printing. If it isn’t fastened properly, it starts creating problems, and it could ruin your print. But what are the best bed adhesion strategies?
In this blog post, we’ll reveal our best bed adhesion strategies for 3D printing to ensure continuous success.
Continue reading for a detailed guide on improving your printer’s bed adhesive!
Factors Affecting Bed Adhesion
Getting perfect 3D prints requires more than just the latest printer and best filament. Bed adhesion—the basis of your creations—is one of the most important but often disregarded factors. Understanding the factors that affect bed stickiness can have a big effect on how well your 3D prints turn out and help you get the most out of your machine.
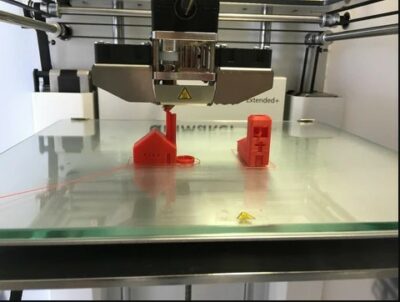
A. Print Bed Surfaces and Materials
3D printing success depends on the print bed material. Glass, BuildTak, PEI, and other materials have different qualities that determine how effectively the printed object sticks to the bed. Adhesion also depends on surface texture. A flat surface may not hold certain materials, whereas a textured surface can improve adherence and print reliability.
B. Bed Heating/Temperature Control
For successful 3D printing, the bed temperature must be maintained. Adhesion depends on filament composition and bed temperature. Heated beds prevent warping and attach the initial layer of the print to the bed surface. This technique strengthens the following layers, improving print quality.
C. Selecting and Preparing Filaments
Your project’s filament material is crucial. Understanding PLA, ABS, PETG, and other filament qualities helps you customise your prints. Pre-printing filament treatment methods like drying or applying adhesive aids can improve adhesion, keeping your creations on the print bed throughout the printing process.
Source-X3D
3D Printer Bed Adhesion Problems and Troubleshooting
Ensuring proper bed adhesion is a critical step in 3D printing, as it forms the foundation for successful prints. Unfortunately, bed adhesion problems can be a frustrating reality for 3D printing enthusiasts, leading to warped or failed prints. In this guide, we will explore some common bed adhesion problems and provide effective troubleshooting techniques to overcome them.
1. Problem: Warping and Lifting of Prints
Warping occurs when the edges of a print lift or curl away from the print bed during the printing process. This issue is often more prevalent with certain materials, like ABS.
Lifting of prints refers to the entire print detaching from the print bed before completion.
Troubleshooting:
- Make sure that your print bed level is maintained to prevent warping and lifting.
- Re-level the bed if necessary, and make sure it is uniformly adjusted across all corners and the centre.
Increase the bed temperature for materials like ABS to reduce the chances of warping. - Check the filament manufacturer’s recommendations for the optimal bed temperature.
- Use materials like ABS, as they may help maintain a stable and warmer environment, reducing the likelihood of warping.
- Apply an appropriate adhesive aid, such as glue stick, hairspray, or a specific adhesive spray, to improve bed adhesion for materials prone to warping.
2. Problem: Filament Not Sticking to the Bed
Sometimes, the first layer of the print fails to adhere to the bed, resulting in a print that gets knocked over or fails to build properly.
Troubleshooting:
- Ensure that the print bed is clean and free from any debris, oils, or residues that may hinder adhesion.
- Use isopropyl alcohol or other suitable cleaning agents to clean the print surface thoroughly.
- Evaluate the print bed material’s suitability for the filament being used. Some materials work better with specific adhesives or surface textures.
- Confirm that the bed temperature is appropriate for the filament being used. Lower bed temperatures may lead to poor adhesion, while higher temperatures can cause warping.
Adjust the first layer height in your slicing software. A too-close or too-distant first layer can impact adhesion. - Reduce the print speed for the first layer to provide more time for the filament to adhere properly to the bed.
- Fine-tune the Z offset (the distance between the nozzle and the bed) to ensure proper first layer adhesion. A slight adjustment can make a significant difference.
3. Problem: Uneven Bed Adhesion or Inconsistent Prints
When certain areas of the print adhere well to the bed while others do not, it can lead to an uneven build and print failures.
Troubleshooting:
- Re-calibrate and re-level the print bed to ensure it is uniformly adjusted across the entire surface. Uneven leveling can cause adhesion inconsistencies.
- Check the surface of the print bed for damage or wear. If necessary, replace the print surface or apply a new adhesive layer.
- Poor-quality filament may cause adhesion issues. Invest in reputable and reliable filament brands to reduce inconsistencies.
- Adjust the print speed and cooling settings to reduce thermal stress on the print, helping to achieve more consistent adhesion.
4. Problem: Over-Adhesion and Difficulty Removing Prints
While strong adhesion is desirable, prints that adhere too strongly to the bed can be challenging to remove without damaging the print or the print bed surface.
Troubleshooting:
- Reduce the bed temperature slightly to ease print removal. However, be cautious not to reduce it too much, as it may lead to decreased adhesion.
- Consider using a different print bed material or surface coating that allows for easier print removal.
- Adjust the cooling fan settings to cool the print bed gradually after the print is completed, allowing for easier print removal.
5. Problem: Rafts and Supports Adhering Too Strongly
While rafts and support structures are meant to aid in adhesion and stability, they may sometimes adhere too well, making them difficult to remove and leaving a rough surface finish.
Troubleshooting:
- Evaluate the print bed material’s compatibility with the filament being used for supports and rafts. Some materials may require specific bed surfaces to prevent over-adhesion.
- Adjust the support settings in your slicer software to reduce their adhesion strength, making them easier to remove while maintaining stability during printing.
- If possible, experiment with different support materials that are easier to remove while still providing adequate support for your print.
Types of 3D Print Bed Adhesives: A Comprehensive Overview
In the realm of 3D printing, choosing the right bed adhesive is a critical factor that can make or break the success of your prints. To ensure you have a comprehensive understanding, let’s delve into the various types of adhesives available and explore their unique properties:
- Blue Painter’s Tape: A popular choice among beginners, Blue Painter’s Tape offers a reliable grip for most prints. It’s easy to apply and remove, making it a convenient option for those starting their 3D printing journey.
- Kapton Tape: Renowned for its high-temperature resistance, Kapton Tape is the go-to adhesive for printing with materials requiring a heated bed. Not only does it provide excellent adhesion, but it’s also reusable, making it cost-effective.
- PEI Sheets: For superior adhesion with a wide range of materials like ABS and PLA, PEI sheets are the ideal choice. Notably durable and easy to clean, these sheets offer a smooth surface finish that contributes to excellent print quality.
- Glass Bed with Hairspray: Combining a glass bed with a light coat of hairspray creates a strong bond between the print and the bed. This combo is particularly useful for prints that demand a flat and smooth surface.
- Magnetic Build Plates: With their magnetic base, these plates securely hold prints in place and make print removal a breeze. Moreover, they can be paired with various adhesive surfaces, adding to their versatility.
- BuildTak Sheets: Offering both robust adhesion and easy print removal, BuildTak sheets are a popular choice among 3D printing enthusiasts. The textured surface finish they provide contributes to better overall print results.
- Glue Stick: An affordable and straightforward option, glue sticks offer good adhesion for prints. They are easy to apply and remove, but larger prints might necessitate reapplication.
- 3D Printing Adhesive Sprays: For a hassle-free application process, 3D printing adhesive sprays create a thin and even layer of adhesive on the bed. They ensure strong adhesion for prints and are suitable for various materials.
Best 3D Printing Software
From sketch to design, SelfCAD is the best 3D printing software. SelfCAD brings together all the artistic and technical tools you need, including Sketching, Sculpting, Rendering, and 3D Printing. Built-in interactive tutorials help you build spectacular 3D models from scratch. SelfCAD’s inexpensive and customizable features make 3D modelling faster, easier, and smoother for freelance designers, business professionals, and educators. SelfCAD is the go-to 3D modeling software for animation, game development, design, and manufacturing experts. Discover 3D design’s limitless potential with SelfCAD.
Conclusion
By understanding the unique benefits and applications of each type of bed adhesive, you can optimise your 3D printing experience and achieve consistently successful prints. Remember to consider the specific requirements of your projects and materials when choosing the adhesive that best suits your needs. Happy printing!