
Accidents can happen, and when you find yourself with a broken phone screen on your Android device, it can be a distressing experience.
Your smartphone’s screen is its most vital component, as we rely on it for tasks such as navigating between apps, sending text messages, checking email, and watching videos. Unfortunately, dealing with a cracked screen can be a significant inconvenience.
Whether the damage resulted from a minor mishap or a significant drop, your initial actions are crucial in effectively managing the situation.
In this guide, we will walk you through a comprehensive set of steps to take immediately after your Android phone’s screen breaks. So, let’s get started!
Step 1. Assess the Damage: Identify the Extent of the Crack and Any Accompanying Issues
When your screen broken android phone screen gets cracked, the first step you have to take is to assess the damage and identify the extent of the crack and any accompanying issues. Here’s how you can proceed.
Check the Touchscreen Functionality:
Start by testing if the touchscreen is working correctly despite the crack. Try tapping, swiping, and using various parts of the screen to see if it responds as it should.
Make a note of any issues you notice, like unresponsive areas or strange behavior caused by the crack.
Look for Internal Damage:
Take a close look at the device, especially around the cracked screen, to see if there’s any hidden damage inside. Check for loose parts, cracks in the internal wiring, or any unusual things happening on the display.
If your device has other features like a camera or physical buttons, test those to ensure they’re still working, too.
Step 2. Backup & Recover Your Data: Prioritize Protecting Your Important Files and Data
When it comes to backing up and recovering your data, especially on Android with a cracked screen, it’s crucial to use a reliable and efficient tool. Dr.Fone is a popular choice among users for its comprehensive features.
It not only helps in backing up your data but also provides options to recover data from a screen-broken Android phone, making it a versatile tool for data management.
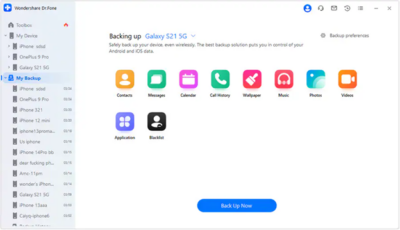
Step 1: Start the Backup Process on Your Computer
Begin by launching the Dr.Fone application on your computer and connecting your Android device to it. Then, navigate to the “My Backup” section and click “Back Up Now.”
Step 2: Set Dr.Fone Link App as the Default SMS App
Before proceeding with the backup, you’ll need to make Dr.Fone Link the default SMS application on your Android device. You can do this by opening the Dr.Fone Link app or accessing your device’s settings. Once done, click “OK” to confirm.
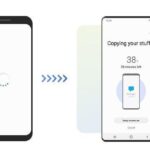
Step 3: Let the Backup Process to Complete
The backup process will start automatically, and you’ll see a progress bar indicating the backup’s completion.
Step 4: Set the Default SMS App Again
As the backup nears completion, a prompt will appear asking you to set the default SMS application back to your original choice. Open your SMS app on the Android device and make it the default again. Click “OK” once you’ve finished this step. If you want to skip this and avoid backing up text messages, you can tap “Cancel.”
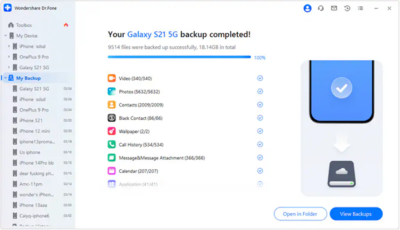
Step 5: Complete the Backup of Your Device
Once the backup is completed, it will be shown in the application window. To access the backup location on your PC, click “Open in Folder.” If you want to view all backups made through the platform, select “View Backups.”
Restoring Android Backup to Android/iOS Device
Here’s how you can do it:
- Select the Backup File
To restore a specific backup to your Android or iOS device using Wondershare Dr.Fone, connect your smartphone to the computer.
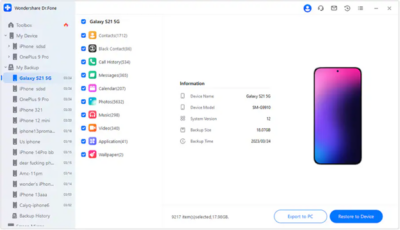
Check the Supported File Types
A new frame will open, showing a list of data that can and cannot be restored to your connected smartphone. The available file types for restoration will vary depending on whether you’re using an Android or iOS device. Once you’ve reviewed the data, click “Continue” to proceed with data restoration.
- Initiate the Data Restoration to Your Device
The following window will show the progress of the data restoration process, including a progress bar.
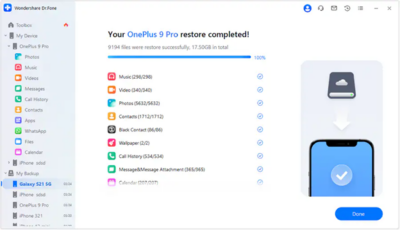
- Complete the Data Restoration to Android/iOS
Once the restoration of Android backup to your smartphone is finished, a prompt window will indicate the completion. Click “Done” to conclude the entire data restoration process.
Step 3. Cover the Crack: Temporarily Protect Your Phone From Further Damage
If your phone screen has a crack, it’s essential to protect it from further damage until you can get it repaired. Here are some temporary solutions:
- Use a Tempered Glass Screen Protector:
A tempered or defective glass screen protector can provide a layer of protection over the cracked area. It’s relatively easy to apply and can prevent the crack from spreading. It also maintains the touch sensitivity of your screen. - Apply Clear Adhesive Tape:
If you don’t have a screen protector, you can use clear adhesive tape as a temporary solution. Make sure the tape is clean and free of dust or lint before applying it to the screen. This can help prevent dirt from getting into the cracks and causing further damage.
Step 4. Seek Professional Repair Services: Options for Fixing a Cracked Android Phone
If your cracked screen Android phone has a cracked screen, you may want to seek professional repair services to fix it.
Here are some options for fixing a cracked Android phone:
Authorized service centers:
You can take your phone to an authorized service center of your phone’s brand. They will use genuine parts and follow the manufacturer’s guidelines to repair your phone.
However, they may charge more than other options and may take longer to fix your phone. You can find the nearest authorized service center by searching online or calling the customer care number of your phone’s brand.
Third-party repair shops:
You can also take your phone to a local repair shop that offers mobile phone services. They may charge less than authorized service centers and may fix your phone faster.
However, they may not use genuine parts and may void your phone’s warranty.
DIY repair with caution:
If you are confident and skilled enough, you can try to fix your phone yourself by using a DIY repair kit. You can buy a repair kit online that includes the tools and parts you need to replace your cracked screen.
However, this option is risky and may cause more damage to your phone if you are not careful. You may also lose your phone’s warranty and data if you do this. You can find a DIY repair kit and a guide for your phone model by searching online.
Step 5. Consider Replacement: Weigh the Cost of Repair Versus Purchasing a New Phone
If your Android phone has a cracked screen, you may want to consider replacing it with a new one.
Here are some factors to weigh the cost of repair versus purchasing a new phone:
Evaluate cost-effectiveness:
Compare the price of repairing your cracked screen with the price of buying a new phone. If the repair cost is more than half of the new phone’s price, it may not be worth it.
You can also check the price of new phones online or in stores.
Identify phone upgrade opportunities:
Consider the age and performance of your current phone. If your phone is old, slow, or has other issues, you may want to upgrade to a newer model with better features and functionality.
You can also look for deals and discounts on new phones from your carrier or other retailers.
Conclusion
Replacing your screen-broken Android phone may be a better option than repairing it if the repair cost is high or your phone is outdated.
To prevent further cracks on your phone screen, you can follow these pro tips:
- Use a case and a screen protector to protect your phone from drops and scratches.
- Avoid putting your phone in your pocket with keys, coins, or other sharp objects.
- Avoid revealing your phone to extreme temperatures or moisture.
- Handle your phone with care and avoid using excessive force on the screen.